Archive
yoyoclouds: Creating A Local Yum Repository on CentOS
yoyoclouds: Creating A Local Yum Repository on CentOS.
Reducing the costs of I.T without reducing the functionally of your systems is one of the major obstacles to overcome. One of these costs is bandwidth.
One of the first bandwidth saving tips any organization should know is the importance of creating a local YUM repository on your LAN. Not only do you decrease the time it takes to download and install updates, you also decrease bandwidth usage. This saving will definitely please the suites of any organization.
This “How To” show’s you a simple yet effective way of setting up your local YUM server and client.
Learn All About the Amazon Simple Workflow Service – Two New Videos
Another great new post by Jeff, the voice may not be that great, but the visual is good…:
The Amazon Simple Workflow Service (SWF) is used to power highly scalable distributed systems at NASA (case study), Sage Bionetworks (case study), and a number of our other customers.
In order to help you to better understand SWF, Balan Subramanian, SWF Product Manager, hosted an hour-long webinar:
Maxim Fateev, AWS Principal Engineer, spent another hour discussing the Flow Framework:
Automating Your Infrastructure with AWS
Demonstration of infrastructure automation with Amazon Web Services.
Sharing CentOS Files with Remote Windows Systems- …

Although Linux is increasingly making inroads into the desktop market, its origins are very much server based. It is not surprising therefore that Linux has the ability to act as a file server. It is also extremely common for Linux and Windows systems to be used side by side both in home and business environments.
It is a common requirement, therefore, that files on a Linux system be accessible to both Linux, UNIX and Windows based systems over network connections. Similarly, shared folders residing on Windows systems must also be accessible from CentOS systems.
Windows systems share resources such as file systems and printers using a protocol called Server Message Block(SMB). In order for a Linux system to serve such resources over a network to a Windows system and vice versa it must, therefore, support SMB. This is achieved using Linux based technology called Samba. In addition to providing integration between Linux and Windows systems, Samba may also be used to provide folder sharing between Linux systems.
In this tutorial we will look at the steps necessary to share file system resources and printers on a CentOS system with remote Windows and Linux systems.
Read the tutorial here …
Update CentOS
There are basically two ways of updating a CentOS machine.. first is by using the GUI and the second, via command line…
Read more here …
Seeding Torrents with Amazon S3 and s3cmd on Ubuntu
Again a nice post by Eric Hammond . Hope its useful for some of you out there…
Amazon Web Services is such a huge, complex service with so many products and features that sometimes very simple but powerful features fall through the cracks when you’re reading the extensive documentation.
One of these features, which has been around for a very long time, is the ability to use AWS to seed (serve) downloadable files using the BitTorrent™ protocol. You don’t need to run EC2 instances and set up software. In fact, you don’t need to do anything except upload your files to S3 and make them publicly available.
Any file available for normal HTTP download in S3 is also available for download through a torrent. All you need to do is append the string ?torrent to the end of the URL and Amazon S3 takes care of the rest.
Steps
Let’s walk through uploading a file to S3 and accessing it with a torrent client using Ubuntu as our local system. This approach uses s3cmd to upload the file to S3, but any other S3 software can get the job done, too.
- Install the useful
s3cmdtool and set up a configuration file for it. This is a one time step:sudo apt-get install s3cmd s3cmd --configureThe configure phase will prompt for your AWS access key id and AWS secret access key. These are stored in
$HOME/.s3cmdwhich you should protect. You can press [Enter] for the encryption password and GPG program. I prefer “Yes” for using the HTTPS protocol, especially if I am using s3cmd from outside of EC2. - Create an S3 bucket and upload the file with public access:
bucket=YOURBUCKETNAME filename=FILETOUPLOAD basename=$(basename $filename) s3cmd mb s3://$bucket s3cmd put --acl-public $filename s3://$bucket/$basename - Display the URLs which can be used to access the file through normal web download and through a torrent:
cat <<EOM web: http://$bucket.s3.amazonaws.com/$basename torrent: http://$bucket.s3.amazonaws.com/$basename?torrent EOM
Notes
- The above process makes your file publicly available to anybody in the world. Don’t use this for anything you wish to keep private.
- You will pay standard S3 network charges for all downloads from S3 including the initial torrent seeding. You do not pay for network transfers between torrent peers once folks are serving the file chunks to each other.
- You cannot throttle the rate or frequency of downloads from S3. You can turn off access to prevent further downloads, but monitoring accesses and usage is not entirely real time.
- If your file is not popular enough for other torrent peers to be actively serving it, then every person who downloads it will transfer the entire content from S3’s torrent servers.
- If people know what they are doing, they can easily remove “?torrent” and download the entire file direct from S3, perhaps resulting in a higher cost to you. So as a work-around just download the ?torrent URL, save the torrent file, and upload it back to S3 as a .torrent file. Share the torrent file itself, not the ?torrent URL. Since nobody will know the URL of the original file, they can only download it via the torrent.You don’t even need to share the .torrent file using S3.SOURCE
Install Tomcat 7 or Tomcat 7.0.26 or Tomcat 6 or Tomcat 5 on Ubuntu 11.10 or Ubuntu 11.04 or Ubuntu 10.10 or Ubuntu 10.04 LTS

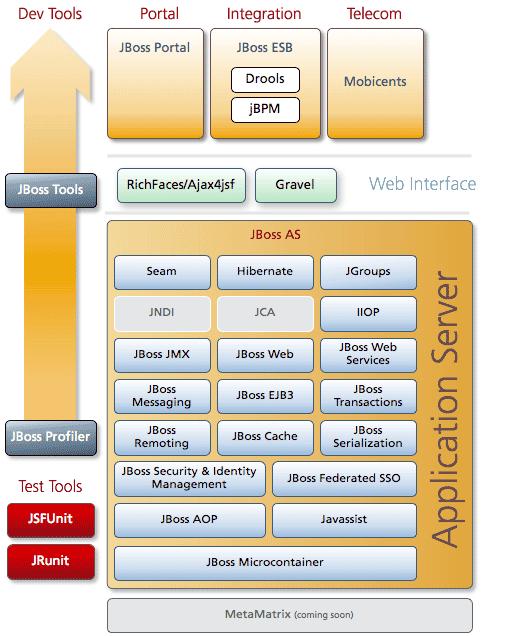
Install JBoss 7.0.2 Application Server on Ubuntu 11.10 or Ubuntu 11.04 or Ubuntu 10.10 or Ubuntu 10.04 LTS
Uploading Known ssh Host Key in EC2 user-data Script
I have not tested this personally, but seems to be a correctly put by Eric Hammond . If you try, do let me know if you find any catchs. 🙂
The ssh protocol uses two different keys to keep you secure:
- The user ssh key is the one we normally think of. This authenticates us to the remote host, proving that we are who we say we are and allowing us to log in.
- The ssh host key gets less attention, but is also important. This authenticates the remote host to our local computer and proves that the ssh session is encrypted so that nobody can be listening in.
Every time you see a prompt like the following, ssh is checking the host key and asking you to make sure that your session is going to be encrypted securely.
The authenticity of host 'ec2-...' can't be established. ECDSA key fingerprint is ca:79:72:ea:23:94:5e:f5:f0:b8:c0:5a:17:8c:6f:a8. Are you sure you want to continue connecting (yes/no)? If you answer “yes” without verifying that the remote ssh host key fingerprint is the same, then you are basically saying:
I don’t need this ssh session encrypted. It’s fine for any man-in-the-middle to intercept the communication.
Ouch! (But a lot of people do this.)
Note: If you have a line like the following in your ssh config file, then you are automatically answering “yes” to this prompt for every ssh connection.
# DON'T DO THIS! StrictHostKeyChecking false Care about security
Since you do care about security and privacy, you want to verify that you are talking to the right server using encryption and that no man-in-the-middle can intercept your session.
There are a couple approaches you can take to check the fingerprint for a new Amazon EC2 instance. The first is to wait for the console output to be available from the instance, retrieve it, and verify that the ssh host key fingerprint in the console output is the same as the one which is being presented to you in the prompt.
Scott Moser has written a blog post describing how to verify ssh keys on EC2 instances. It’s worth reading so that you understand the principles and the official way to do this.
The rest of this article is going to present a different approach that lets you in to your new instance quickly and securely.
Passing ssh host key to new EC2 instance
Instead of letting the new EC2 instance generate its own ssh host key and waiting for it to communicate the fingerprint through the EC2 console output, we can generate the new ssh host key on our local system and pass it to the new instance.
Using this approach, we already know the public side of the ssh key so we don’t have to wait for it to become available through the console (which can take minutes).
Generate a new ssh host key for the new EC2 instance.
tmpdir=$(mktemp -d /tmp/ssh-host-key.XXXXXX) keyfile=$tmpdir/ssh_host_ecdsa_key ssh-keygen -q -t ecdsa -N "" -C "" -f $keyfile Create the user-data script that will set the ssh host key.
userdatafile=$tmpdir/set-ssh-host-key.user-data cat <<EOF >$userdatafile #!/bin/bash -xeu cat <<EOKEY >/etc/ssh/ssh_host_ecdsa_key $(cat $keyfile) EOKEY cat <<EOKEY >/etc/ssh/ssh_host_ecdsa_key.pub $(cat $keyfile.pub) EOKEY EOF Run an EC2 instance, say Ubuntu 11.10 Oneiric, passing in the user-data script. Make a note of the new instance id.
ec2-run-instances --key $USER --user-data-file $userdatafile ami-4dad7424 instanceid=i-... Wait for the instance to get a public DNS name and make a note of it.
ec2-describe-instances $instanceid host=ec2-...compute-1.amazonaws.com Add new public ssh host key to our local ssh known_hosts after removing any leftover key (e.g., from previous EC2 instance at same IP address).
knownhosts=$HOME/.ssh/known_hosts ssh-keygen -R $host -f $knownhosts ssh-keygen -R $(dig +short $host) -f $knownhosts ( echo -n "$host "; cat $keyfile.pub echo -n "$(dig +short $host) "; cat $keyfile.pub ) >> $knownhosts When the instance starts running and the user-data script has executed, you can ssh in to the server without being prompted to verify the fingerprint
ssh ubuntu@$host Don’t forget to clean up and to terminate your test instance.
rm -rf $tmpdir ec2-terminate-instances $instanceid Caveat
There is one big drawback in the above sample implementation of this approach. We have placed secret information (the private ssh host key) into the EC2 user-data, which I generally recommend against.
Any user who can log in to the instance or who can cause the instance to request a URL and get the output, can retrieve the user-data. You might think this is unlikely to happen, but I’d rather avoid or minimize unnecessary risk.
In a production implementation of this approach, I would take steps like the following:
- Upload the new ssh host key to S3 in a private object.
- Generate an authenticated URL to the S3 object and have that URL expire in, say, 10 minutes.
- In the user-data script, download the ssh host key with the authenticated, expiring S3 URL.
Now, there is a short window of exposure and you don’t have to worry about protecting the user-data after the URL has expired.
AWS – Migrate Linux AMI (EBS) using CloudyScripts
In a typical Amazon Web Services(AWS) Environment, Amazon Machine Images (AMIs) are strictly available in a certain region only. These AMIs cannot be moved from one region to another. Though the AMIs are shared within different Availability Zones of the same region. For this purpose, you can use a third party tool called as CloudyScripts.
CloudyScripts is a collection of tools to help you programming Infrastructure Clouds. The web-based tool is self explanatory and regularly updated. In case you find any bug, do not hesitate to email the owners right away.
Goto the CloudyScripts Copy AMI to different region tool.

AMI should be EBS-backed Linux AMI only. The AWS Access Key and Secret Key can be found at the Security Credentials page of your AWS Account. This information is unique to your account and can be misused. DO NOT share these details with anyone.
The key provided should be generated in the source and target region before using the tool. Provide the .pem key files.
AWS discourages use of “root” user for login into AWS EC2 Instances.
You may use different ssh users like, “ec2-user” for AWS Linux Instances or “ubuntu” user for Ubuntu instances.
Output will be displayed as:

Verify that the AMI is registered in the destination as Private to you i.e.owner.
If you opt to receive mail of the status, enter your email id in the status window.
The mail will be received as:

